

Friday, June 28, 2013
Hand Lettering: Brave
Thursday, June 27, 2013
My 100th Blog Post
Today marks my 100th blog post on Wouldn't it be Lovely. On February 5th, I wrote my first post, and have posted every weekday since. I have posted my wedding projects, home projects, calligraphy exercises, wedding inspiration boards, home decor inspirations boards, and more. When I decided to start blogging, I knew it would be tough to balance my time between a full time footwear design job, working on all the jobs for my own event design company, tackling numerous home improvement and DIY projects, and meanwhile, blogging about it all! It was all a bit maddening in the beginning, but I've always been happier and more productive when I'm right on the edge of crazy anyway. As I reach my 100th post, I feel like I've got it pretty much under control. Could I use more time? OF COURSE! That being said, I'm proud of all the projects this blog has pushed me to do. Without the blog, the timelines would have been drastically longer, and some projects might not have happened at all. Most of all, I love sharing all my projects, seeing people pin them on Pinterest, talking about them at work, or commenting on the blog. Ideas and projects are always best when shared! Below I have put together two boards including some of my original projects, home and wedding. that I have designed and made since starting the blog just 5 short months ago! Happy 100th post to me! Here's to 100 more!

 From left to right my DIY projects: Dog Bed, Drawer Pulls, Pipe Shelf, Nail & String Sign, Leather Mouse Pad, Good Morning Pillows, Wood & String Vase, Desk Chair Redo, Outdoor Cart Redo, Patio Chair Redo, Leather Clutch, Paper Cut Art, Eames Chair Redo, Type Case, Patio Table, Jewelry Holders, Nail Headboard, Chalkboard Globe, Guest Room
From Left to Right: Event Design Projects: Confetti Bags, Favor Jar, Wedding Escort Cards, Easter Cake, Save the Date, Pom-Pom Place Card Holders, Easter Egg Surprise, Love By Numbers, Black & White Wedding Invitation Suite, Edible Favor Jars, Dino Drink Stirs, Watercolor Wedding Invitation Suite, Baby Shower Favors, Animal Birth Announcement, Message in a Bottle Escort Cards, Lakeside Wedding Invitation Suite, Wedding Escort Card Displays, Lemon Wedding Favors, Jar Wedding Favors, Birthday Bunt Cake, Wedding Programs
Wednesday, June 26, 2013
Home Trend: Pink Decor
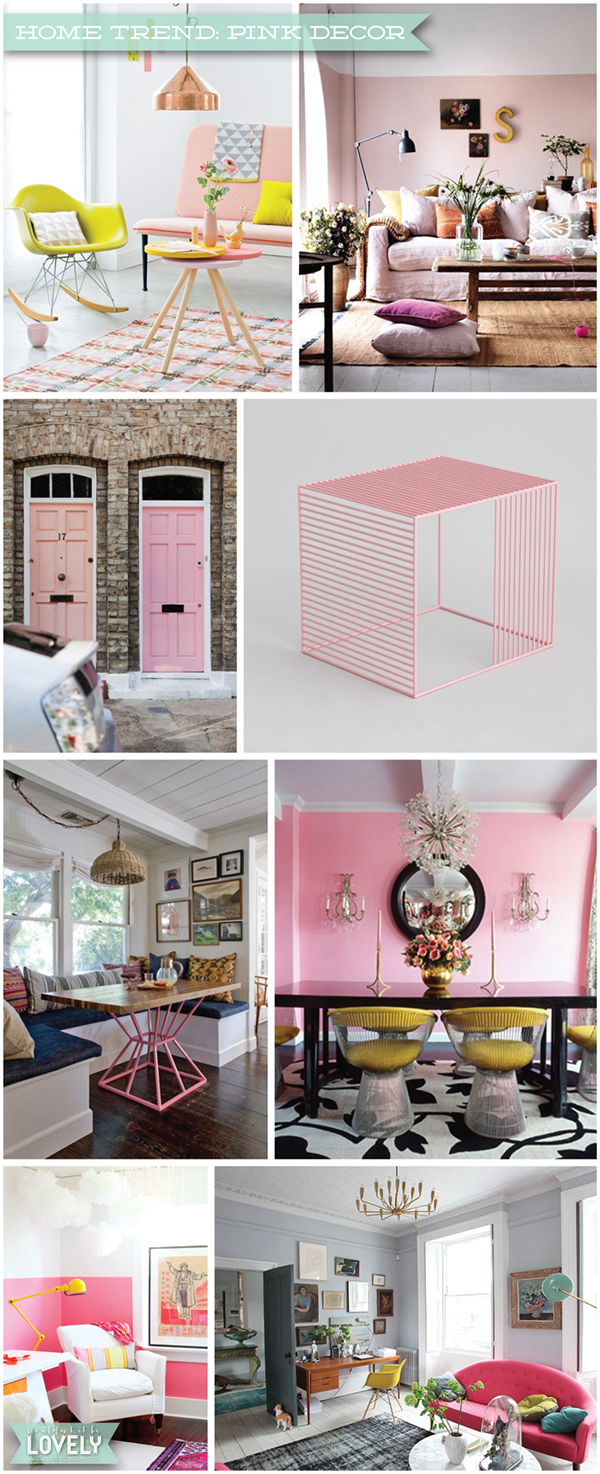
I did a wedding post about light pink weddings earlier in the week, and I thought it would be nice to follow up with pink home decor. Not the pinks of old, meant only for little girls, but pinks that feel like a dude could actually live with them without feeling emasculated. From softer pink walls to hits of pink paired with more masculine colors and accent furniture, these shades feel fresh and welcoming.
1. Pink Rug & Couch 2. Pale Pink Wall 3. Pink Doors 4. Pink Wire Side Table 5. Pink Table Base 6. Pink Dining Room 7. 1/2 Pink Wall 8. Pink Couch
Tuesday, June 25, 2013
DIY:Outdoor Cart Table Redo

In my quest to make a lovely outdoor space, I knew we needed a table by our new Ikea chaise lounges (which I just got for my birthday)! I found this lovely little table in an antique warehouse near us. I saw it and immediately fell in love with the shape and knew I could breathe new life into it with a bright coat of paint. Though the transparent grayish plastic and brass had a certain appeal, it didn't really feel right next to the other things we have outside. I taped up the wheel feet, took out the plastic surfaces, cleaned the whole thing with a rag and some soap and pulled out the spray paint. I used Rust-Oleum spray paint in a nice greenish yellow color for the frame, and white enamel spray paint for the plastic bits. Remember when you are spray painting, lots of light coats! Trying to cover the whole thing in one spray session leads to drips and cracked paint. Whenever I spray paint, I usually have other projects I'm doing at the same time so I don't get too impatient, this weekend my alternate activity was sipping margaritas and getting a tan with my friend while the paint dried! I love how my little table come out, now it feels fresh and fun, the new color really makes the most of it's unique shape.
Monday, June 24, 2013
Wedding Color Pallet: Pale Pink

Pink weddings can be a hot topic, there are very few guys who can fully embrace a pink wedding. My advice? Stay away from hot pinks and fuchsia, instead go with pale pinks and blush pinks which can feel more muted and digestible. To keep it from feeling like a little ballerina wedding, keep the pink on the blush side with yellow undertones, mix it with gold (NOT silver, a matte grey is acceptable if paired with other lighter colors), some bleached oranges and yellows to keep it feeling modern and fresh. Stay away from true easter like pastels and go instead for colors that feel as though they have been bleached by the sun. Another way to keep pale pink feeling fresh is to pair it with colors that do not highly contrast it, in other words, go with khaki or light grey suits instead of black and use greenery that is lighter in your bouquets.
1. Menu 2. Balloon 3. Table 4. Pink Blazer 5. Pink Clouds 6. Floral Arrangement
Friday, June 21, 2013
Hand Lettering: Favorite Sound

Another song inspired, hand lettered quote this week. This one is from Ingrid Michaelson's song, "Parachute". A verse with a lovely sentiment.
So I've been playing with a couple different tools for all these hand lettering exercises, from sharpies, to felt tip calligraphy pens to traditional fountain calligraphy pens. To be honest. I haven't found one I really like yet, maybe it's just perfecting it? I liked the traditional one the best, but it seemed like the ink always ran out at the worst times and it would get all clogged up and not flow nicely after a bit. I need to look into this, there has got to be some trick I'm missing.
Have a great weekend!!
Thursday, June 20, 2013
Pom Pom Place Card Holders

Just made some pom pom place card holders, perfect for a wedding, bridal shower, or baby shower! I've been wanting to make some pom pom decor for a while, I remember making little yarn balls when I was younger, and they are super fun! They are so cute and can be done in any color so there are endless possibilities! A whole event full of pom pom decor sounds like a party I'd like to go to! Contact me if you'd like pom pom place card holders for your next event!
Tuesday, June 18, 2013
Wall Mirrors Under $125

Oh the many positives to hanging mirrors: One, they reflect light to make rooms look bigger. Two, they are like art and bring a certain feel to a room, without the stress that some people encounter when purchasing art. Three, though mirrors can go anywhere, there are certain areas of your house which must have mirrors! Those being the entryway, ALL bedrooms (don't leave you're guests hanging!), and lastly, bathrooms. Four, you can check out your lovely self and make sure you don't have food stuck in your teeth.
- Bamboo Starburst Mirror $19
- Glossy Green Mirror $124.99
- Metal Mirror $103
- Hanging Round Mirror $29.99
- Bear Mirror $72
- Starburst mirror $129
Sunday, June 16, 2013
DIY: Patio Chair Before & After

When we moved into our house, I unearthed these white patio chairs in our shed, they were rusted, covered in cobwebs and generally icky. I figured that you see chairs like these EVERYWHERE and I should be able to save us some money by giving them some redesign love. I tried about three different ideas for what the seat bases would be, from fabric to rubber cording, and ended up going with some wood slats. All the pictures are below as well as instructions on how to do this DIY lawn chair project yourself!

Materials:
- Old lawn chairs
- Six 8ft lengths of 1x3 pine
- 48 2 inch machine screws and bolts
- Spray paint
- Outdoor deck stain
- New plastic end caps for the feet
Tools:
- Electric screw driver
- Drill bit that can go through metal
- Saw (hand or electric, there aren't TOO many cuts that you could do it by hand)
- Foam paint brush
Process:
- Cut off all the existing strapping and pull of old icky end caps
- Wipe off cobwebs and grime with soap and water
- Spray paint chairs with color of choice I used Rust-Oleum Champagne Mist. Allow to dry while you work on the wood.
- Cut pine to length, I cut mine about an inch longer than the outside width of the bars, I used a chop saw, an invaluable tool for home improvements!
- Lightly sand the wood
- Stain pine with outdoor deck stain so that they are resistant to the weather- allow to dry
- Use masking tape to hold the wood slats where you want them to go.
- Flip over chair so you are screwing through the aluminum chair base first. Screw holes through the wood and aluminum chair frame simultaneously to insure that they will line up when you put in the machine screws. Make sure your drill bit is a bit larger than your machine screws. When drilling through metal, remember to let the drill do the work, go slowly with only minimal pressure so the bit will not break.
- Thread screws through the holes and tighten bolts.
- Note: I only used four slats on the seat base because I intended to top them with a cushion (the ones in the photo I got at Home Goods for $15 each!), if you don't want to use cushions, I would recommend spacing them a bit closer together and adding a fifth slat.
- You're done! Now go get a drink and enjoy the sunshine!
Saturday, June 15, 2013
Best of Wedding Signs

- String sign: I made one like this not that long ago, I have the instructions on a previous post. these are so fun and can be repurposed as art in your home after your wedding.
- Black arrows: These are simple and to the point, a great way to direct your guests at a larger wedding site.
- Raw wood signs: I made these for Alex & Ben's wedding. I used raw edge boards to play in with the rest of their decor.
- Light bright sign: This sign is so cute and simple, and easy DIY project that can say whatever your heart desires.
- Program sign: I love this idea in lieu of individual paper programs. Place this large painted sign in a place where all your guests can see it. It adds to the decor and would probably cost around the same as paper programs.
- Chalkboard sign: This is a lovely idea for a first impression of your event, include pertinent information such as a schedule, menus, and numbers for local taxi companies so guests can drink with abandon!
- Photo montage sign: Building a wall with a painted message and little shelves is a great way to incorporate mementos and photos in an outdoor wedding where there may not be an obvious place for such items otherwise.
- Small chalkboard signs: By having a bunch of small chalkboard signs made, you can have various signs filled out the day of if you are not sure of what you may need beforehand.
Friday, June 14, 2013
Buying Happiness with Little Puppies

A couple people I know have been getting puppies recently, which makes me jealous and takes me back to when our dogs were itty bitty. There is little that makes me happier than getting some snuggle time with a cute little puppy (or a full grown dog for that matter). The smell of puppy breath can brighten any gloomy day! This is a picture of our American Mastiff, Truman when he was eight weeks old and about 25lbs, that was a little over a year and 135lbs ago. It blows my mind to look back at these pictures and see how quickly he has grown! Hope you have a great weekend and snuggle your dog or find someone else's to squeeze! Cross your fingers for nice weather, I have projects to do!
Thursday, June 13, 2013
Wedding Favors: Cookie-Dough Cheesecake Jars

These cookie-dough cheesecake favor jars were the last element I made for Sylvia and Brian's wedding. I probably ate about 10 of them as I was making them because they are ridiculously delicious. These were set up on a table for guests to take as they left the wedding, because after all that dancing, it's nice to have something to eat on the car ride home! These are for sale in the store. Edible favors are so much better than some kitschy object that guests will either forget or trash after your wedding, why not give them something they will actually enjoy? We had the couples wedding logo on the side of the jars, a little message of thanks and description of the dessert on the top, and these super cute little wooden spoons tied to the side so that you can truly eat them anywhere! The other designs I did for this couple were their invites, programs, and escort cards, which I've shown below.


Wednesday, June 12, 2013
Lovely Ceiling Light Fixtures

All of the bedrooms in our house have ceiling fans. Big, white, ceiling fans. We haves central AC, and the feel of fans gives me the heebie-jeebies so I want to take them all down. Though I am a big fan of table and floor lamps for "mood lighting" and general every day lighting, having a good ceiling light is generally more convenient. I may end up making my ceiling lights when push comes to shove to save some money, and to do something custom and interesting. That being said, these are some of the lights that have sparked my interest. They are all different or unique in some way, and each has some element that I find appealing.
1. rattan: This lamp is lovely with lots of character.
2. modern: I love this classic mid-century pendant.
3. schoolhouse: Who can resist a classic school house styled lamp? Not me!
4. geometric: This one is quite pricy, but so lovely, this has the potential to be a DIY project.
5. wire cage: Another pricy option, but this one would be an EASY DIY.
6. gold leaf: Classic and lovely if you had the right space for it.
Tuesday, June 11, 2013
DIY: Type Case Simple Upgrade

Monday, June 10, 2013
Black & White Wedding

There is something classic and clean about a black and white wedding. Sometimes black and white weddings can looks a little dated with the use of silver accents or damask prints. Keep it fresh with natural accents in tans and browns, tie in some lace, silhouette art, chalkboard callouts, graphic prints and maybe even some white spray painted party animals for place cards! Your flower choices are plentiful in all whites too, black eyed susans, big bouquets of babies breath, and white hydrangeas are some of my favorites.
1. globe & suitcases 2. graphic dress 3. babies breath 4. papercut invites 5. party animals
6. bridesmaid dress 7. thank you chalkboards 8. silhouette cake topper
Friday, June 7, 2013
Wedding Pallet: Yellow & Khaki

For my wedding, almost three years ago now, I was all about yellow and grey. Yellow has always made me happy. Though that pallet is still popping up, it's starting to feel dated. A great update to that much loved pallet, is yellow with khaki colored neutrals, hits of gold, and small hits of green or pink if you're inclined to add another color. I love how fresh and clean it feels, perfect for a bright and happy spring or summer wedding.
1. flower 2. place setting 4. lemon dessert 5. bouquets
Thursday, June 6, 2013
Custom Wedding Escort Cards
,
I designed these escort cards are for a wedding coming up this weekend. They tie in perfectly with the invites and the programs I also made for this lovely couple. If you don't have the money or space for an elaborate escort card display, just adding some flowers and a simple prop, like this chalkboard globe, turns it into a lovely little set up instead of just rows and rows of escort cards.
Wednesday, June 5, 2013
DIY: Chalkboard Globe

Chalkboard paint is the best. It just makes everything more fun! I had my Moms (Chris's and Mine), who are both teachers, search their schools for old unused globes. I thought they could be fun projects. I started with the one that has a nice metal frame and decided to make it into a place where Chris and I could write notes to each other, and it would make a nice prop for wedding photos, as you'll see on Thursday's post! It was a super easy project, only taking about an hour, I taped up the metal frame and pulled out the trusty chalkboard paint and a brush and had at it. I did three coats to be safe and make sure you couldn't see the brush strokes. I love how it came out. Now, the question is, what fun things can I do with the second globe!?
Tuesday, June 4, 2013
It's My Birthday!

It's my birthday today! WOOHOO! I'm turning 28, which means it's only two little years until I'll be 30! For some reason, this birthday I have been thinking about the things I have accomplished, experienced, and seen, as well as all the things I have yet to do.
I am fortunate enough to have fallen in love with my best friend and high school sweetheart and get married at 25, we just bought our first house this year, have two crazy dogs, great families, friends and jobs. I started my own business and blog doing what I love. I've been lucky enough to travel all over the world for work and for pleasure. I've seen almost every big city in Europe, been to a large part of Asia, visited many of the biggest and best destinations the US has to offer, and more. I've been sky diving, white water rafting, horseback riding, rock climbing, surfing, and cliff diving. This year I did my first pull up and lifted 150lbs over my head by doing crossfit. As I look back at all these things, I realize just how fortunate I am and how much I have to look forward to. This little montage I made displays just a couple things I'd like to do before I turn 30. I'm generally not a fan of the "bucket list", it tends to put too much pressure on doing thing within a certain timeline, so I look at this as more of a wish list for the next couple years. That being said, setting goals and making plans allows you to realize how blessed you are, and how much the world has to offer.
Monday, June 3, 2013
Living Room Inspiration

I stumbled upon this BEAUTIFUL painting by Karen Smidth the other day, and just couldn't help but imagine an entire room to go with it! Our Living room is already done... which is nice and all, but it's fun to start from scratch! Here's what I might do if I had another living room to buy for!
1. Painting $995 2. Wall light $145 3. Coral sofa $1100 4. Ratan Chair $200 5. Pouf 6. Rug $400
Subscribe to:
Posts (Atom)